Adjustable Control Arms, Old Post
This is an instructional post, do not use this information for ordering your parts, check the parts description for current pricing and availability.
News flash! The best source we've found for the tie rod end used as the upper ball joint for the Miata spindles is Rock Auto. Their catalog page is...
http://www.rockauto.com/catalog/catalog.php
...and if you put "ES2074R" in the "Look for a part" window in the upper right of that page, you'll get a couple of choices. Rock Auto has enough purchasing power that they can retail this part for less than our cost on it.
These control arms are designed for Miata front spindles, but have been adapted for use on a variety of spindles—even McPherson strut spindles—by fabricating adapters (e.g. weld- or bolt-in "hockey pucks" in cut down McPerson struts) or reaming tapers to fit the Miata ball joints.
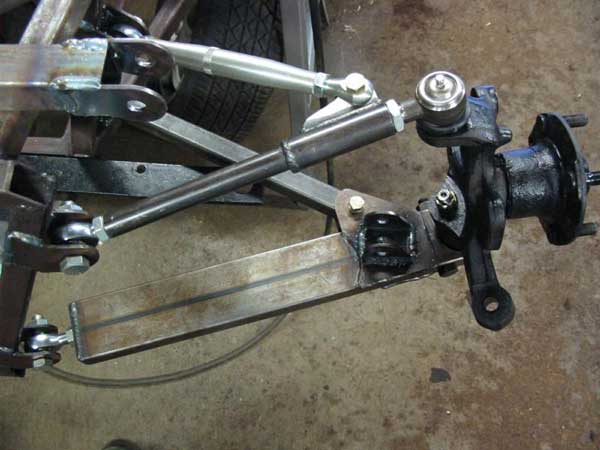
Here are our adjustable front control arms, shown with rod ends and ball joints...
...and here is a lower control arm, mounted on a late CMC chassis. For some reason, I left the AN6 bolt out of the photo, the bolt which holds the rear arm to the forward arm. That bolt is included with the control arm assemblies or kits (as are its washers and nylock nut), as is similar hardware in the upper control arms, though rod ends and ball joints are not--we offer rod ends in a variety of styles, and ball joints to fit a variety of spindles.
Note the shock mount bracket above. Since there is quite a bit of variety in shock installations, we leave selecting that bracket to you—we offer a couple of standard sizes (1/2" bolt holes, 1.025" or 1.250" spacing between the sides) to suit most 1/2" eye ball end or bushing shock bodies, and we can make other sizes if there's call for them. To make alignment easier, our brackets have a 1/8" hole in the center; once you've decided where the bracket should be, use that hole as a guide to drill a 1/8" (or #30) hole through the plate and pop rivet the bracket in place. If you decided wrong, it's a heck of a lot easier to replace a pop rivet than a weld.
Once you're sure the bracket is where you want it, weld the bracket to the upper plate and remove the rivet.
We also offer these control arms as a weld-it-yourself kit; they're 25 bucks off per control arm so that'll save you $100 on the complete set of four (two upper, two lower). With these kits, the steel tubes come longer than you need--you trim them to your own specs and weld in the bungs, plates and tabs. And for folks who would like to fabricate these parts themselves, we have a page full of front suspension drawings.
As of 1/1/2013, here's what comes in an upper control arm kit:
You'll note a few upgrades since the earlier version—the clevis tab is an inch longer and the main tube is a swaged down and threaded, instead of being 3/4" for its full length. The tab upgrade allows you to use larger coilover diameters without the spring rubbing the control arm, and allows you more flexibility in caster adjustment. The main tube upgrade reduces unspring weight. The 16mm jam nut is now included (everybody using this UCA needs one, and they're a nuisance to find locally) and you'll also note a greatly simplified CPVC Suspension Simulator.
What's improved about this simulator? For one thing, it's so cheap for us to make that we throw it in free when you buy two upper control arm kits...and presuming your car has two sides, you'll want two control arms, right?
The trick is, 1/2" CPVC is just slightly under 1/2" ID (YMMV, but it's close enough) so you can thread 1/2" rod ends and clevises right into the tube without tapping tapping the tube first. If you find it's a little loose for your tastes, slip a strip of paper between the tube and the clevis/rod end, that'll tighten it up.
The other CPVC tube slips into the unthreaded end of the 16mm bung. To make it fit snugly, wrap the tube in tape as needed. In the photos above, I used green painters' tape but you can use whatever is handy—yes, including duct tape.
Of course, you need to weld the clevis tab to the 16mm bung before you insert the CPVC tube in the open end of the bung. Then you can assemble the "simulator" and install it between the chassis and the spindle.
The tube on the left is the main (front) tube; I put it in the photo above so you could see how it's formed. When you're satisfied with the length adjustments you made in the simulator, mark the main tube where you want it to fit in the bung, cut it one inch longer than your mark, and press the tube into the bung to your mark, thus spigoting the main tube 1" into the bung. Oh yes, and weld the tube and bung together. Read the front suspension drawings before you start welding the parts together.
Once you've determined the length of the rear tubes using the simulator, make or purchase proper radius rods. There are how-to instructions in the but for the price (less than ten dollars each) these swaged aluminum radius rods are a bargain. They're light weight, look good, and will save you a lot of work.
These radius rods have 1/2-20L threads in one end and 1/2-20R threads in the other. We stock them in 1" increments, 5" through 8", and if anyone ever orders a pair outside that range, we'll increase our stock accordingly. Odds are, your measurements aren't going to put your radius rod length on an even inch, so these are threaded deeply enough to cut up to 1/2" off each end without compromising the 3/4" minimum thread depth appropriate to 1/2" rod ends. This is a good time to remind you: for rod ends and clevises, thread insertion depth should be a minimum of 1-1/2 times the thread diameter—and threads inside the jam nut don't count.
Here's what comes in a lower control arm kit:
 |
The plate with the 12mm hole goes on the bottom of the main (front) lower control arm tube, superimposed on the hole on the bottom (not visible) of the tube. Read the front suspension drawings for further assembly details. The 0.2" steel spacer tube (shown below the AN bolt, nut and washers) is spec'd as stainless steel on the drawing; we've gone to a thicker wall mild steel spacer, so if you care to, you can drill a small (1/8" or so) hole alongside the 12mm hole in the bottom of the main tube, and weld the spacer in place before welding the lower plate in place. This will save you some alignment fumbling when installing lower ball joints, but then again, how often do you have to install lower ball joints? Determine (roughly) where the rear tube will fit on the plates and drill a 3/8" hole through the tube. For precise alignment, bolt the tube between the plates before welding the top plate in place. The simulator is another piece of CPVC—drill a 3/8" hole through it sideways to bolt it between the plates—and for the main tube, you can cut it roughly to length (a little long, please), put a rod end in the rectangular bung, and slide the bung deep inside the tube. You can clamp the bung in place with a C-clamp pinching the flats of the tube. |
In practice, you'll probably want to establish the dimensions of the lower control arms before the upper control arms, since the LCAs will establish track width (and wheelbase, to a small extent) and because you'll do your fine tuning with the UCAs.
The following installation photos are courtesy of Nathan Engdahl, from his Miata-based build log on LocostUSA.com. His car has a number of interesting innovations, but all we're going to look at here is the front suspension. Nathan built his car a while ago, when the UCA main tubes were heavier and the clevis tabs were shorter, and BTW, if for some reason you prefer the older style arms and tabs (historical value, perhaps?) we've kept a few spares on hand.
The upper front shock mounts are on a tube that doesn't exist in The Book. It's a good addition for a couple of reasons. It extends the shock upper attachment point outward, which makes the angle of the shock (in reference to the lower control arm) less acute, and allows the lower shock bracket to be placed closer to the lower ball joint.
Why are these Good Things? Because they both increase the amount of shock travel relative to wheel travel (which improves damping and allows a lower spring rate) and because moving the lower shock mount outboard reduces the beam load on the lower control arm. If you cruise the suspension strings on Locos forums, you'll find a number of cars with front lower shock mounts further inboard than these, with the control arms bent at the shock mount point. You don't want that.
Another benefit of mounting the upper shock mounts on a seperate tube is, you can do a lot of adjusting and experimenting before you commit to welding the tube to the frame. In fact, you don't ever have to commit to welding them to the frame—you can make that tube a bolt-in, which gives you the option of changing shock geometry when and if you change shocks.
Here's an example. Nate moved his upper shock mounts inboard from his first guess, to soften the suspension a bit. He's using QA-1 large body shocks (I don't know the spring diameter but it's significantly bigger than the usual GAZ shocks we see on most Locosts). They're still more than an inch outboard of the 'book' bracket-under-the-frame-rail upper shock mount.
A further benefit is, by tying the shock upper ends together and thus attaching each shock to both upper frame rails, frame flex is reduced. This, too, is a Good Thing.
You may have noted that Nathan's chassis doesn't use standard suspension brackets. These two piece angle brackets were developed to deal with a rare but challenging problem. Sometimes frames are built to the book, with intent to use bushings at the suspension pickup points, but before the brackets are welded on, the builder decides that rod end control arms are the better way to go. 'Scuse me if I've mentioned this before, but rod ends are much stiffer and stronger if loaded radially than axially (typically 7 to 10 times stronger) so it's good to avoid side loads when you can. Nowadays, most US-made Locosts have the suspension mounting tubes (LA and B, FU1 and 2) angled to face the rod ends, but if yours was made without that feature, these two piece brackets will angle the mounting bolt for alignment with the rod end, with no need for high misalignment washers.
The dark side(s) of the brackets are
1) The have to be accurately aligned or the 1/2" bolt won't go through them. The easy way to align them is, bolt a rod end (with spacers/washers) between them before tacking them to the chassis. Note we put a 1/8" alignment hole in them (as we do on the lower shock mount brackets; see commentary near the top of this page) to further simplify the task.
2) They cost more to make than the standard suspension brackets. They're laser cut, since we don't have the quantities necessary to make punching them practical, and they require their own bending fixture and there are twice as many parts to bend. Bottom line is, they're about 50% pricier than the one piece bracket.
(re dark side #1: there was some discussion of this on LocostUSA.com, with one guy saying these brackets "...look like a nightmare to install." Dave Hempy, who used these brackets in his build, responded...
"The two-piece brackets are no trouble to install. Just stack the two sides, two spacers and the rod end together, then bolt the assembly solid. Carry that whole assembly over to the car, side it on the chassis tube, and it will pretty much hold itself in place. Add a C-clamp when you get it where you want it and tack weld. No problem. Possibly easier than a regular bracket, since it is easy to clamp in place with a rod end in place."
Sounds good to me.
